October 22, 2026
In this article, we will cover:
- Why webhooks are powerful for Tapfiliate automations
- What you need before setting up event-driven workflows
- Step-by-step webhook trigger setup
- Two detailed real-world example workflows
- How to test and verify your setup
Tapfiliate’s Triggers & Webhooks feature allows you to automatically react when something happens in your affiliate program, such as a conversion being created or an affiliate signing up.
Instead of manually exporting data or polling the API, Tapfiliate can push event data instantly to:
- External systems (CRMs, Slack, analytics tools, etc.)
- Internal workflows using Tapfiliate’s own REST API
Pros
- Real-time automation: Events like conversions or affiliate sign-ups propagate immediately to other systems or workflows.
- Internal event chaining: One event can natively initiate another (e.g., create a commission after an affiliate is added)
- External integrations: Sync Tapfiliate events with CRMs, support tools, internal dashboards, and more
Use Cases
- Automatically add new affiliates to an external CRM
- Create affiliate prospects when a customer is created.
- Trigger Slack or email alerts for large conversions
- Sync commission updates to accounting tools.
Prerequisites for Using Webhooks
Before setting up webhooks, make sure you have:- A Tapfiliate account with access to Triggers
- Your Tapfiliate API key (Profile → API key)
- An endpoint URL that can receive HTTP requests
- (Optional) A tool like Zapier, Make, or a custom backend
Step 1: Create a New Trigger
- Go to Tapfiliate Dashboard → Triggers
- Click New Trigger
- Enter a title and description for your workflow
Step 2: Choose the Trigger Event
Select when the trigger should fire, for example:- Conversion created
- Affiliate created
- Commission updated
Step 3: Apply Filters (Optional)
You can limit when the trigger fires, such as:- Only for a specific program
- Only if commission value is above a certain amount

Step 4: Choose the Webhook Action
Under Do the following…, choose one of the following:- Webhook - sends a predefined payload
- Webhook (custom) - lets you define headers and payload structure
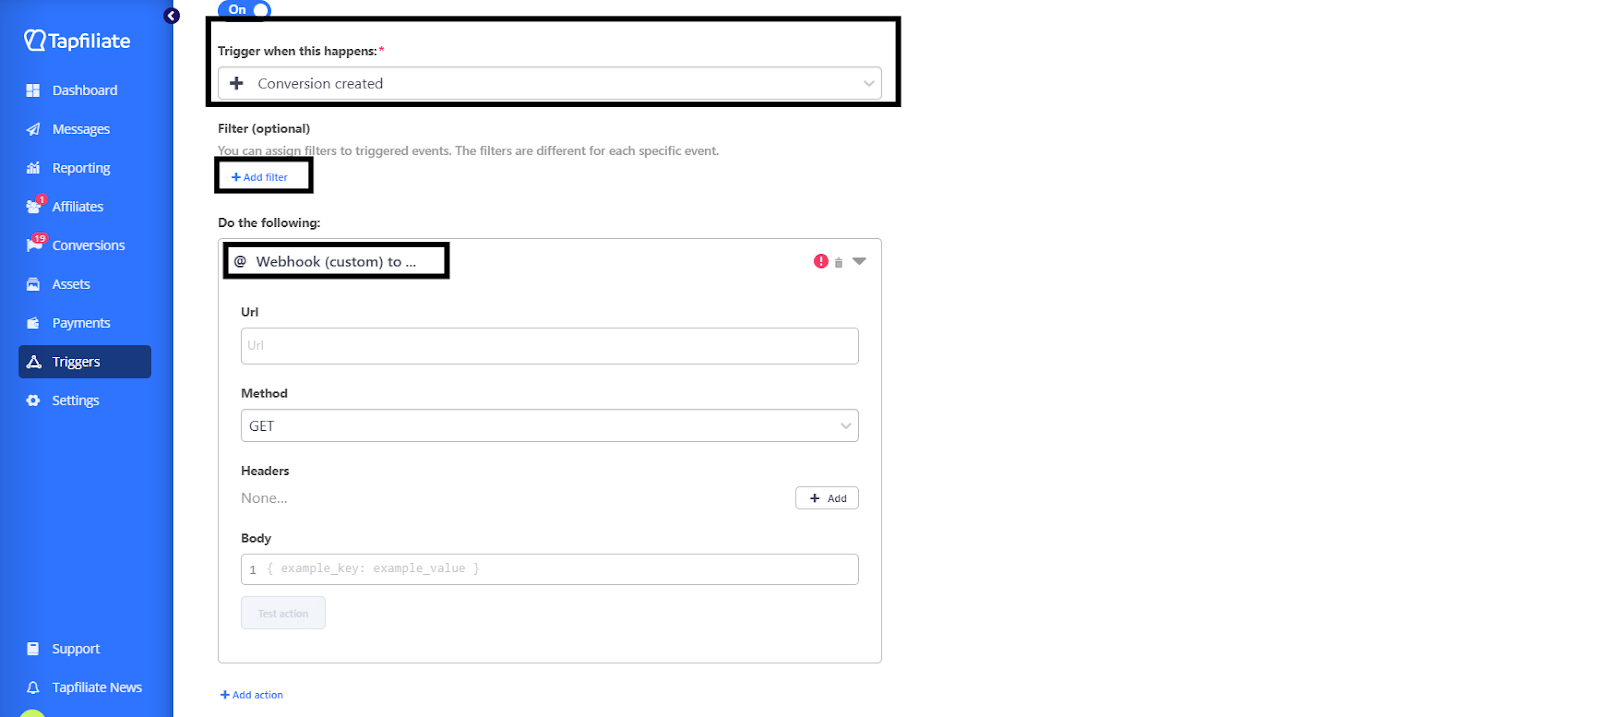
Step 5: Configure the Webhook
- Enter the destination URL (a public http:// or https:// address; requests to private or internal network addresses are blocked)
- (Optional) Add headers like Authorization or Content-Type
- Use merge tags to include dynamic Tapfiliate data in the payload
Step 6: Save and Test
- Save the trigger
- Use Test action to verify the webhook fires correctly
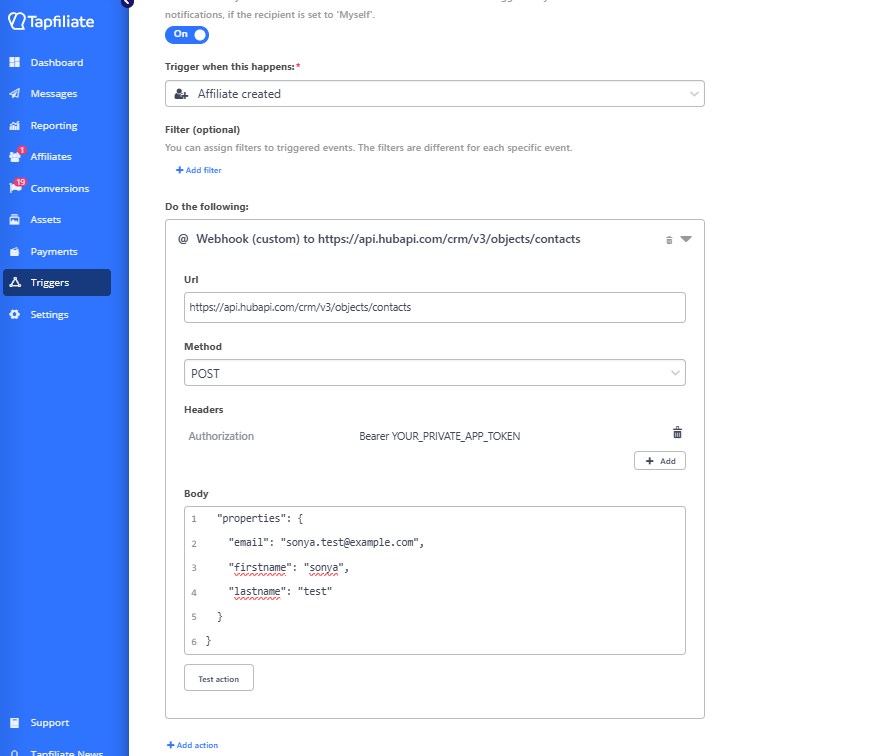
Use case: Immediately add or update every newly created affiliate as a contact in HubSpot CRM. This is used to directly sync anyone signing up to your affiliate program directly to your CRM without any manual intervention.
Setup:
- Trigger Event: Affiliate created - this fires whenever an affiliate is created in the system.
- Use the Hubspot’s “create a contact” API endpoint as the url of the webhook, and add the headers and Body of the API.
- You can dynamically send data in your webhook by using the “tags” available in the webhooks URL and Body.
- Complete the setup and hit “test action” to test your webhook.
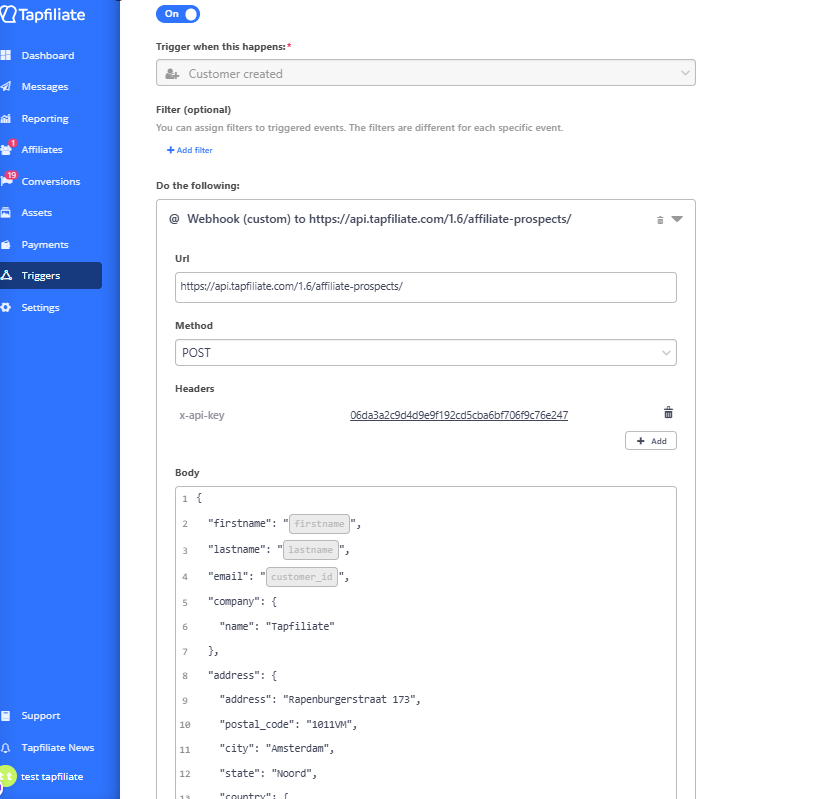
Use case: Immediately add or update every newly created customer as an affiliate prospect in Tapfiliate account. This adds each customer as an affiliate prospect and triggers a mail to refer their peers to become affiliates in Tapfiliate. This feature can help automate your referral process which can be used to promote your program via your customers.
Setup:
- Trigger Event: Customer created — this fires whenever a customer is created in the system.
- Use Tapfiliate’s “create an affiliate prospect” API endpoint as the url of the webhook, and add the headers and Body of the API.
- You can dynamically send data in your webhook by using the “tags” available in the webhooks URL and Body.
- Complete the setup and hit “test action” to test your webhook.
- Trigger a test event (create a test conversion or customer)
- Use the Test action button in Triggers
- Confirm the receiving system gets the payload
- Check logs or responses for errors
- Verify the expected action occurred (CRM entry created, prospect added, message sent, etc.)
Need More Help?
If you have questions about building advanced event-driven workflows, chaining internal triggers, or connecting Tapfiliate to third-party tools, contact us at support@tapfiliate.com, we’re happy to help.